October 29th, 2010 · 3 Comments

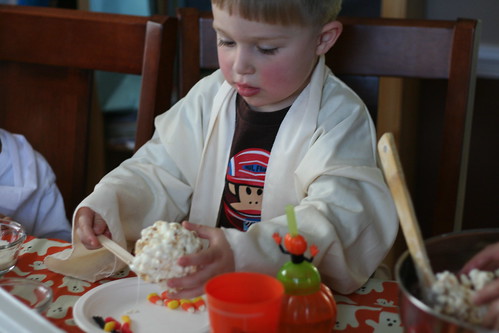
What do you get when you combine four 4-year-olds, Halloween costumes, and make-your-own popcorn ball Jack o’Lanterns? Sweet, sticky fun! With a small dash of chaos. 😉
Kids Halloween Luncheon Menu
- nuts & dried cranberries
- “Goblins” on a Log
- Monster (Carrot) Fingers
- “Pumpkin” Grilled Cheese
- local Apple Cider

It was a beautiful day, but cooperation for organized games was a little lacking … we managed the pillow case race and one round of the “pumpkin walk” before the kids ran back inside to play.
The party centerpiece — White Chocolate Seckel Pear Ghosts — doubled as party favors, and we decorated popcorn ball Jack o’Lanterns before wrapping up with the boy’s favorite Halloween show: Word World’s “Kooky Spooky Halloween” (we <3 PBS Kids!). So much fun!

Recipe: Popcorn Balls
Ingredients:
- a large bowl of plain, air-popped popcorn (about 8 cups)
- 1 bag mini marshmallows
- 1/4 cup butter
- pinch salt
- to decorate: white chocolate candies, candy corn, gummy worms &/or licorice ropes.
Instructions: In a large saucepan, melt butter over low heat. When completely melted, stir in salt and marshmallows, stirring to coat marshmallows with butter. Cook, stirring occasionally, until marshmallows are melted into a smooth liquid. Remove from heat. Pour melted marshmallow over popcorn, stirring with nonstick spray-coated wooden spoons until thoroughly combined. Oil hands, then grab a large handful and roll into a ball. Set on wax or parchment paper and let rest.
To make Jack o’Lanterns: Melt a small piece of white chocolate bark. Provide kids each a small assortment of candy (candy corn, gummy worms, etc.), a popsicle stick and a little bowl of melted white chocolate. Have them use the popsicle stick to apply the white chocolate “glue” and attach candies.
Makes 8 balls. Wrap uneaten balls in plastic wrap, but they’re best eaten the same day you make them. Enjoy!

Happy Halloween!
Tags: cooking with kids · holiday · recipes · sweets
October 25th, 2010 · 5 Comments
Fall is my favorite time of year, especially here in Virginia where we are blessed with beautiful weather and picturesque colors this time of year. After growing up in the Pacific Northwest, with those infernal evergreen trees, the brilliant shades of fall leaves here never fail to impress me. And of course it’s not truly fall ’till we’ve ventured to the pumpkin patch. This year, with two kids in tow — and unlike her big brother’s first trip, the Foodie Bebe didn’t sleep through the whole experience. Of course, that may be because we spent the entire day at the farm… But when your farm is part working farm, part Disneyland (right down to the crazy insane lines for the hayrides and food), what else can you expect?

the great pumpkin hunt at Butler's Orchard
The past two years we’ve gone to Butler’s Orchard in Germantown, Maryland. It’s large, but activities are spaced out so it doesn’t feel quite as crazy as some of the other local pumpkin extravaganzas. It’s a 60-year-old, family-owned farm, and they actually grow things there. I have nothing against farms who turn into amusement parks if that’s what they need to do to lure people in and turn a profit, I just ask that they actually still grow something. When so many places just plop pumpkins from who knows where into a field, it’s nice to see some honest-to-goodness pumpkin vines. I don’t know if all the pumpkins were grown there (there was a remarkably high percentage of “ginormous” pumpkins, as the boy would say), but close enough for me. There’s a farm store where you can get all sorts of apples, baked goods, canning supplies and other harvest accoutrement as well. On weekends in October, there’s live music, bouncy houses, giant slides, caramel apples, barbecue, apple cider, pony rides, a corn maze …. even pedal tractors and a pumpkin coach pulled by mice (with a little help from a tractor).

A long day of play on the farm demands a hearty breakfast first, and this pumpkin loaf is a perfect start. (Made with our homemade pumpkin puree, not the carving pumpkins we got on the farm.) I used whole wheat pastry flour to add just a smidge of healthfulness, but you can use white if you prefer.
Recipe: Whole Wheat Pumpkin Bread
- 1 cup whole wheat pastry flour
- 1/2 cup unbleached all-purpose flour
- 1 teaspoon baking soda
- 1/2 teaspoon salt
- 1/2 teaspoon cinnamon
- 1/2 teaspoon nutmeg
- 1/2 cup butter, melted and cooled
- 1 cup pumpkin purée
- 1/3 cup sour cream
- 3/4 cup light brown sugar, packed
- 2 eggs
- 1 teaspoon vanilla extract
For the Maple Glaze:
- 1/2 cup powdered sugar
- 1 tablespoon maple syrup
- ~ 1 teaspoon water
Instructions: In a large bowl, whisk together flours, baking soda, salt, cinnamon and nutmeg. In the mixing bowl, beat the eggs on low speed until combined. Add pumpkin, sour cream, butter, vanilla and sugar and mix on medium low until smooth. Add dry ingredients, mixing on low until just combined. Pour batter into a lightly greased bread pan (9x5x3), level off the top, and bake at 350 degrees for 50 minutes to 1 hour. Let cool in the pan on a cooling rack for 10 minutes before removing from pan.
To make the glaze: Whisk together powdered sugar and maple syrup, then add water until a thin consistency is achieved. (If you have maple extract, add 1/4 teaspoon.) Drizzle over the cooled loaf and let stand a few more minutes before slicing.
Makes 1 9-inch loaf. Enjoy!

Tags: baking · breakfast · fresh from the... · recipe · recipes · whole grains
Happy October! While I may spend my Septembers pretending summer isn’t over, October 1st is officially time to bring out the Halloween decorations, head to the apple orchards and pumpkin fields, and begin the fall baking season. And nothing says fall like pumpkin … bread, muffins, pie, cheesecake, there is no shortage of ways to enjoy my favorite fall flavor. While the recent canned pumpkin shortage is reportedly over, I still prefer to avoid BPA-contaminated canned foods and make my own pumpkin pureé. It’s really quite simple, and one good sized pumpkin will make enough to last through the fall. Naturally the best place to begin is at the farmers market, where you can find all sorts of unique and flavorful pie pumpkins — I’ve had good success with the Cushaw and Cinderella pumpkins pictured below. Just ask your farmer which variety he or she recommends for baking.

You can also likely find something labeled a pie or sugar pumpkin at the grocery store right now, which is where I picked up this little pie pumpkin.

To begin, use a sharp knife to cut off the stem and then halve the pumpkin.

Use a spoon to scrape out the pumpkin guts. Added bonus of baking your own pumpkin pureé? Pumpkin seeds, which you must save, wash and roast. We’ll come back to that.

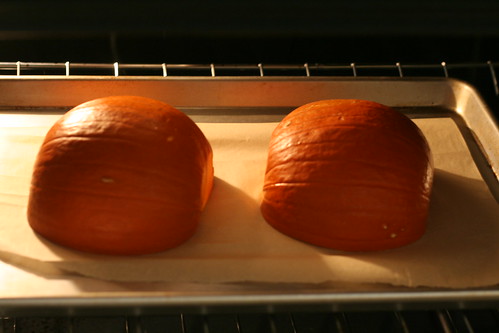
Place your cleaned pumpkin halves cut side down on a parchment-paper lined rimmed baking sheet.

Bake at 400 degrees for 50 minutes to an hour, until pumpkin is soft to the touch.

Remove from the oven and let cool. Then scoop out the baked flesh, and divide it into one cup portions. Freeze what you’re not using right away, and just thaw a portion in the refrigerator whenever you’re ready to bake.
Now about those seeds. Once dry, toss them with a tablespoon of melted butter or olive oil and your favorite seasoning combination — cinnamon and sugar, cumin and chili pepper, smoked paprika, etc. Roast at 400 degrees for 7 to 9 minutes, stirring occasionally to ensure they brown evenly. Remove from oven, let cool and enjoy!
What’s your favorite pumpkin treat?
Tags: at market · baked goods · baking · pantry
September 24th, 2010 · 2 Comments
Do you know where your food comes from? Sure, you go to the market, exchange a few pleasantries with the farmer as you shell out cash for those locally-grown carrots or free-range eggs, but do you really know where they come from? This weekend is the first of several fall farm tours around the DC area — the perfect opportunity to take the kids out to see where their food comes from, up close and personal.

Virginia’s Rappahannock County Farm Tour takes place Saturday and Sunday, Sept. 25-26. Participating farms include Mount Vernon Farm and the Farm at Sunnyside, two farms whose names might be familiar if you’ve dined at any of DC’s farm-to- table restaurants. Farms are naturally kid-friendly, and this tour promises baby calves, sheep-herding demonstrations and more. Visit the website for more information.
The Loudoun County Fall Color Farm Tour takes place October 15-16, mark your calendar!
Tags: recipes
September 22nd, 2010 · 1 Comment
I wasn’t kidding about squeezing every last bit of summer out of the month. Today may be the first day of fall, but don’t pack up the ice cream maker just yet. It’s supposed to reach 90 degrees in DC again today, and you can still find sweet white nectarines at the farmers market. So I implore you, take some home and make a batch of this sweet summer gelato before it’s too late. (Or, save it for some of those peaches you froze for winter. Ice cream is a year-round food, in my opinion.)

Recipe: Nectarine Gelato
Ingredients:
- 5 medium-sized nectarines
- 5 egg yolks (preferably from your local egg farmer)
- 2 cups cream-top whole milk (or just whole milk)
- 1 cup organic cane sugar, divided
- 1 tablespoon lemon juice
- 1 teaspoon vanilla paste (or extract)
- 1/4 teaspoon almond extract
- 1/4 teaspoon ground nutmeg
Instructions: Coarsely chop nectarines (no need to peel) and place them in a non-reactive saucepan. Combine with 1/2 cup sugar, lemon juice, vanilla, almond extract and nutmeg and bring to a simmer over medium low heat. Simmer for about 15 minutes, stirring occasionally, until fruit is soft and you can mash it with the back of the spoon. Let cool, then puree in a blender or food processor.
In a heavy-bottomed pot, warm milk and the other 1/2 cup of sugar over medium heat just until bubbles begin to appear and sugar is dissolved, stirring occasionally.
In a mixing bowl, whisk the egg yolks well for about a minute. Ladle the warm milk into the egg yolks, whisking continuously, one spoonful at a time until you’ve incorporated about half the milk into the eggs. Then pour the eggs/milk back into the remaining milk in the pot. Cook, stirring frequently, over medium low heat until the mixture thickens slightly and coats the back of your spoon. Remove from heat, stir in the nectarine purée and let cool. Transfer to a bowl or pitcher, cover, and chill overnight or for at least 8 hours in the refrigerator.
Process the chilled mixture according to your ice cream maker’s instructions. I have the KitchenAid ice cream maker and mix it on medium low for about 12 minutes. Transfer to a tupperware container and freeze until firm, about 4 more hours. Makes 1 quart. Enjoy!
Note: You can adjust the sugar in the nectarines according to the sweetness of your fruit.
Tags: at market · recipes


